

The WelcomeScreen Pro Plus Plan delivers the ultimate guest experience by combining the TV App, Digital Guidebook, and AI Messaging into one powerful solution. Guests can access important property information on the in-room TV and their mobile devices while receiving instant AI-powered assistance throughout their stay. From check-in to check-out, Pro Plus helps you automate guest communication, reduce repetitive inquiries, and provide a seamless, personalized hospitality experience.
After signing in to WelcomeScreen, you'll be directed to the Setup Dashboard, where your account setup begins. This dashboard provides a clear overview of your setup progress and showcases the features included in your selected subscription plan, helping you get started quickly.

Once your account is created, connect WelcomeScreen with your Property Management System (PMS) to streamline your property management workflow.
This integration automatically syncs your listings, reservations, and guest details, reducing manual data entry and saving valuable time. By keeping your information up to date in real time, WelcomeScreen helps you deliver a seamless, accurate, and personalized guest experience across all connected devices.
If you’re not currently using a PMS, you can still manage your properties easily by adding them manually. WelcomeScreen’s user-friendly interface allows you to enter and update listing
If you are using a Property Management System (PMS), you can click on the “PMS Integration page” link shown in the highlighted section. This will redirect you to the PMS integration section, where you can automatically sync and import your listing details.
When you click on “Sync Listings,” all listings from your PMS are imported at once. You can easily track the status of each listing in the “Connection” column. This indicates whether the TV app is connected, the Guidebook is created, or if both are active. This setup makes it simple to identify active listings and monitor their connectivity at a glance.

If you are not using a PMS, you can add a listing manually by entering the listing name under the listing column and then the listing address. Once done, click on “+ Add Listing”, and your listing will be added successfully.

You can add additional listings from the Listings tab by clicking on “+ Add Listing.”
a). You can find all the app download links within the Install TV App setup section, just a click away.a). You can find all the app download links within the Install TV App setup section, just a click away.
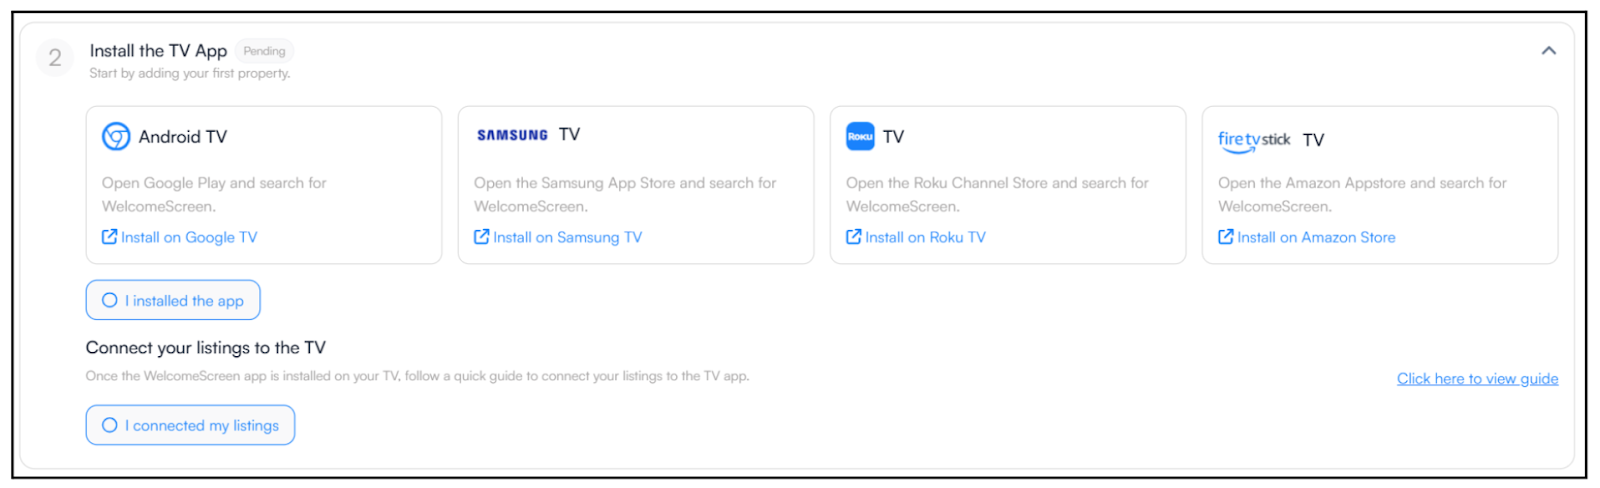
b). Once your listing is created either manually or through PMS integration, you can easily access the Guidebook section and click on “Create Guidebook” to get started. The guidebook will automatically open for the listing displayed at the top, ensuring you are creating and managing content for the correct listing.
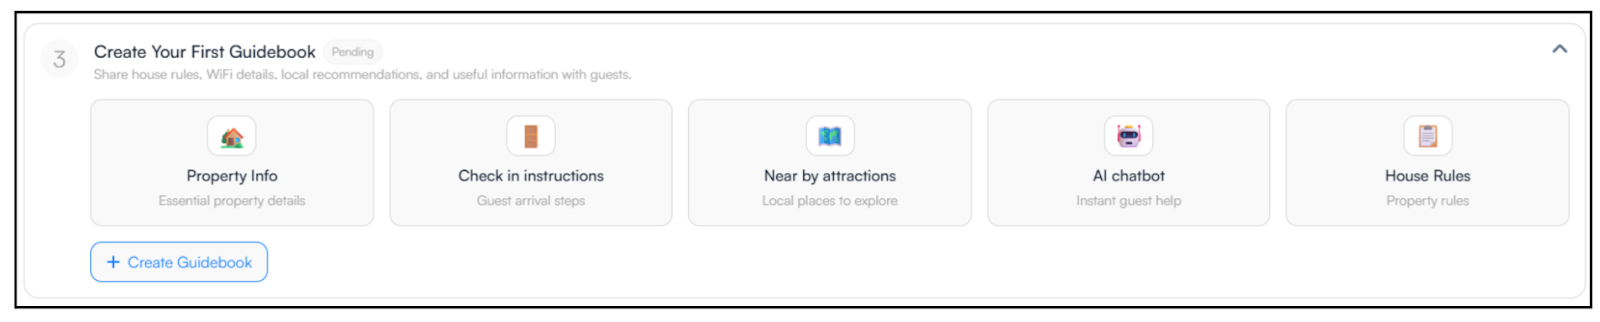
Follow the link below for a complete, step-by-step guide on how to create and set up your guidebook.
-Guidebook Creation: Learn how to create a digital guidebook for your listing to share essential guest information
-Guidebook Set up: Understand how to customize and configure your guidebook for a seamless guest experience.
You can easily enhance your guidebook by adding recommendations using our AI-powered suggestions. Follow the link below to learn more: AI Recommendation
After adding your listings, go to the Listings section and select the listing you want to configure by clicking the Edit button. This section allows you to customize your in-room TV display and digital guest experience to match your brand and hospitality standards. From here, you can adjust screen settings, choose display themes, and upload high-quality images or videos to create an engaging and visually appealing presentation.
You can further personalize your listing profile by updating the background image and music, adding your logo and website details, and entering important guest information such as Wi-Fi credentials, contact details, and service instructions. You may also highlight nearby attractions, restaurants, and local events to help guests explore the area. Please note that these features are available in the second and third layout options.
All the settings you configure in this section play a vital role in delivering a consistent, professional, and personalized guest experience.
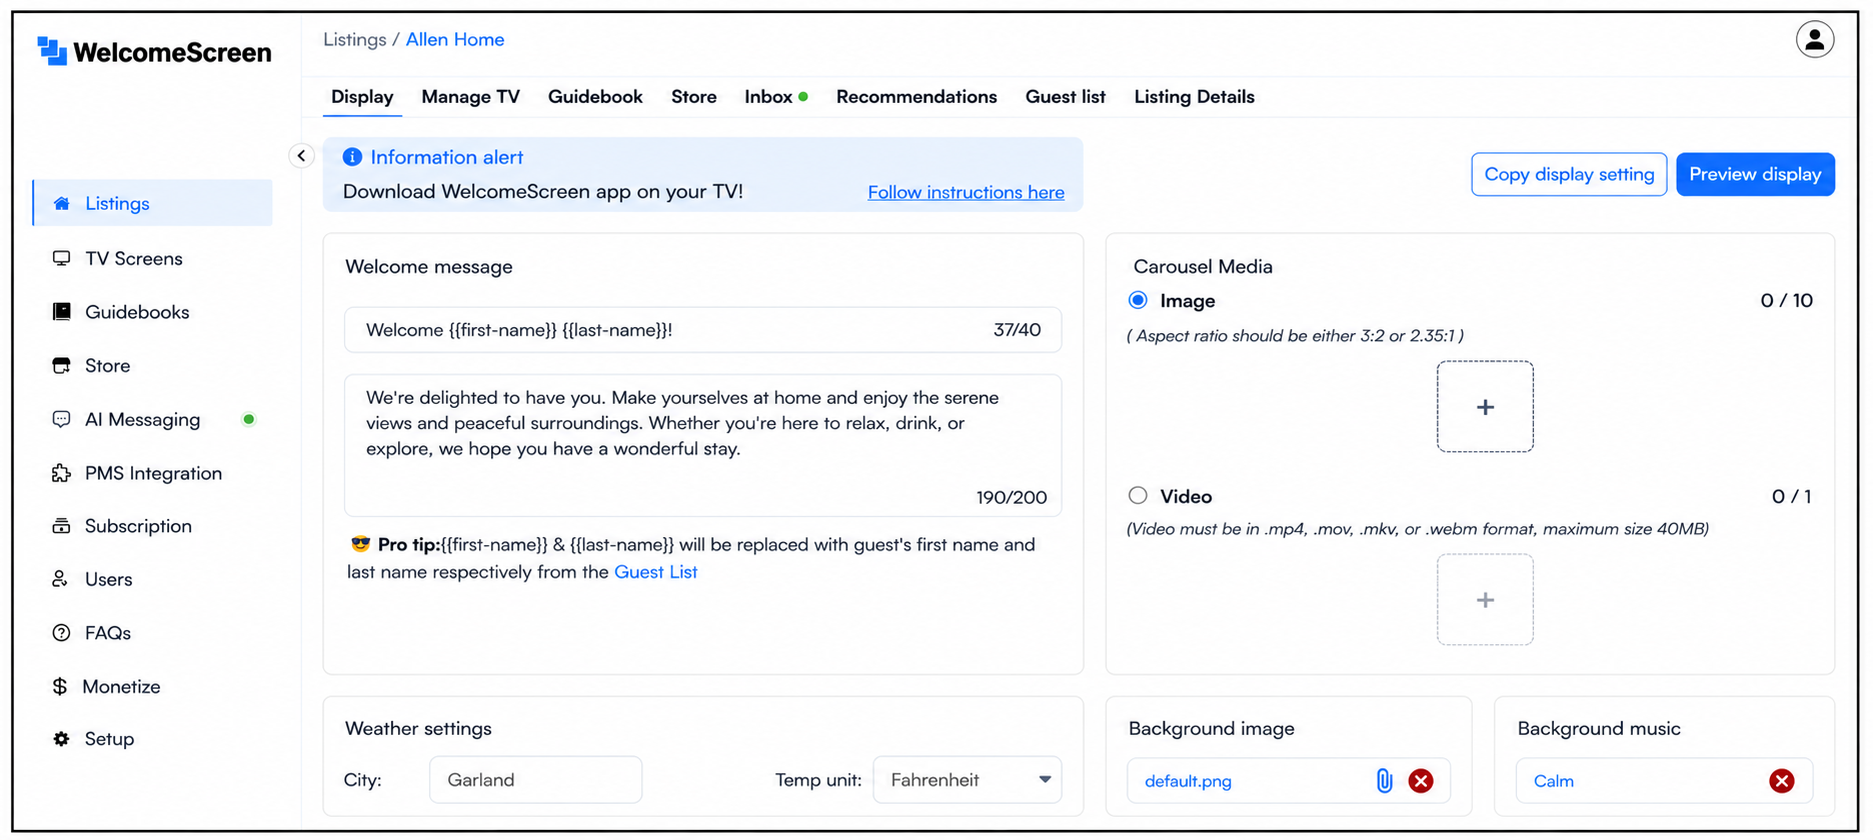
Once you’ve completed all the setup and configurations, the next step is to connect your WelcomeScreen to the TV. Any updates made on your dashboard will reflect on the screen in real time, helping you create a seamless and professional first impression for your guests.
Connect WelcomeScreen to Your TV - A quick guide to help you link your dashbaord to the TV get eveything up and running smootly.
Step 6: Ai Messaging in WelcomeScreen
AI Messaging helps hosts manage guest communication more efficiently by bringing all guest messages into WelcomeScreen. Messages sent through your PMS are synced instantly, allowing hosts to view and respond to inquiries from one place.
AI Messaging: Learn how AI Messaging delivers faster, smarter, and more personalized guest communication.
Manage Your Subscription
Looking to switch from your Pro Plus Plan to another subscription?
View the Pro Plus Plan Switching Guide for step-by-step instructions.
Congratulations! Your WelcomeScreen Account Is Ready!
Need help installing the app? Check out our step-by-step installation guide for easy setup.
For additional assistance or questions, contact the WelcomeScreen support team at: support@welcomscreen.com


.png)